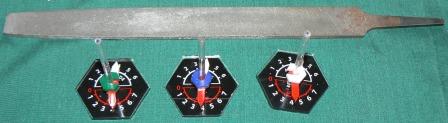
Using I-94 Enterprises Flight Stand adaptors to show roll, pitch, yaw.
This series of alterations and instructions requires the following items to revise most flight stands.
The Basics
We’re going to remove the flat /disc magnets, smooth the now open end of the stick and glue FS-5 over the stick.
Spherical magnet IN-203 will seat into the cup on FS-5. Be careful regarding magnetic poles being vertical. For this to work, the poles have to be vertical.
Glue FS-10 airplane adaptor into the center of gravity of the miniatures. For Raiden models, this is the small hole with or without a spotface (small flat dish) in the bottom of the miniature.
Fly well. Good tactics just annoy the dice.
**********************************
FS-5 adaptors use a 1/8” (3.2mm) rod diameter on flight stand.
Pliers, file. Glue (we prefer epoxy). Something to mark the spherical magnet as to pole direction (permanent marker or similar)
And to modify 12 ‘typical’ flight stands, the following:
2 packs IN-203, ¼ (6.4mm) spherical magnets.
1 pack of 12 FS-5 stand adaptors. 1 pack of 12 FS-10 aircraft adaptors.


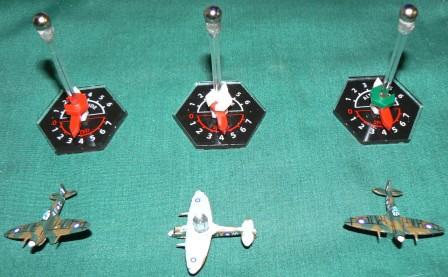
Raiden GBR 12 Spitfires Mk V with Beacon Decal # BR-106.
Stands shown are modified FS-1 stands from Regal Minis / Last Square. They’re on this website as FS-1 Flight Stands
Minis shown painted and decalled by Chris Geisert. You can contact him on our painters’ link, he’s our house painter.
**********************************
File / remove any glue from end of rod.
Place FS-5 cup over rod. At nominal, there is .005” / .012mm clearance. Things may not be round.
Wring cup onto rod as needed.
Apply glue into end of cup – FS-5. Place over rod, twisting to spread glue. Glue magnet onto cup. Make sure pole is up. Set against another magnet, mark magnetic pole with a permanent marker, glue so mark is up. The stand adaptor can be painted as desired.
Flight stands with FS-5 adaptor and ¼” magnet glued up.
Part number FS-10, aircraft adaptor shown. It fits to magnet and provides roll, pitch and yaw.
To attach FS-10 adaptor to planes. Comments – Most of the Raiden line of aircraft miniatures have a recess and a .20” / 5mm spotface (flat) in the bottom of the miniature on the horizontal centers of mass. Glue FS-10 into the bottom of the miniature. If the hole needs to be deepened or enlarged, use a 5/64 (2mm) drill as needed. The ‘super glues’ work well. Epoxy works better.
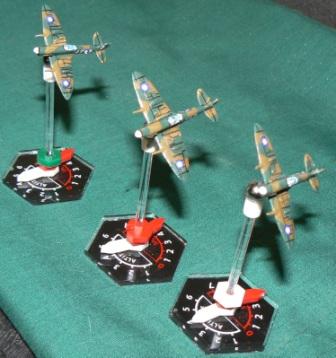
And a couple of photos showing the range of motion… Enjoy.